Note: This blog is very long because I want to document my experience within 8 years of being in this hobby. Feel free to skip around with the Table of Contents.
Table of Contents:
- I Joined This Hobby In 2017
- Keyboard #1: Exclusive E6.5 (65% keyboard)
- Keyboard #2: Leopold FC600M - Extensively Modded (65% keyboard)
- Keyboard #3: Qazpad (40% keyboard)
I Joined This Hobby In 2017
It’s been 8 years since I’ve joined this hobby and I feel like it’s coming near an end.
I first learned about this hobby after a couple friends from high school started to talk about it. This was in 2017 which meant this hobby had limited options to build your “dream” keyboard. Custom keycaps costed close to $180 and keyboards being near $400 and that’s the preorder price. Insane it was, but seeing people’s own custom keyboard drove me to try to find my own.
That I did and I talk about the different keyboards I own now below, but times has change - I’ve changed so I no longer feel connected to the community anymore. I consider writing this blog as a tribute or Ode to my journey.
As I write this blog, I noticed that my modding journey with my keyboards has a reoccuring theme. That theme is me spending way too much time, money, and effort to mod a keyboard that I could buy with better specs. I won’t lie and say modding wasn’t tiresome, but the reward to that is knowing no one in the world has the same exact keyboard as me. It’s fun to reimagine items in ways you once thought was impossible.
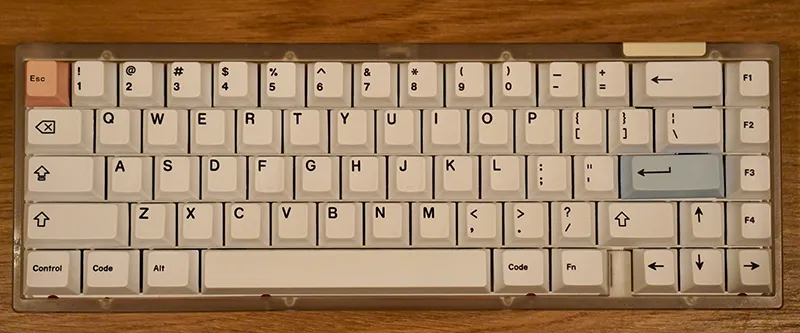
Keyboard #1: Exclusive E6.5 (65% keyboard)
Product page: https://exclusive.run/products/exclusive-6-5
Specs:
- Owned since 2020
- Polycarbonate Case (PC) (note: different from plastic injection molded case)
- Switches: Silent Alpacas
- Spring swapped to 55g lubed with Krytox GPL 105
- Lubed with Krytox 205g
- Filmed
- Stabilizers:
- Spacebar (SwagKeys Knights v3)
- Rest (TX AP Stabilizers Rev 4)
- Custom cerakoted badges
- Installed Millmax Sockets 7305 for hotswap support
I knew I always wanted a PC keyboard because it’s 1.) light weight compared to aluminium cases and 2.) has high end feeling even though it’s plastic because it’s custom milled. The cost of the customizations and modding I’ve put into this keyboard is … quite a lot to say the least, but I’m not one to have multiple daily drivers and that is what modding is about right? Customize to make it yours.
Challenges:
- No QMK support
- Tuning spacebar stabilizers
No QMK support
I had some issues with the original PCB and was luckily able to find a backup on r/mechmarket, however the backup PCB did not support QMK but instead supported a retired keyboard layout editor. This meant changing the layout of my keyboard was a big hassle.
I struggled with this for a couple of years before I decided last year to take on the challenge to create my own QMK firmware and port it to Vial (an open source VIA) to allow programming my keyboard on the fly / without reflashing. To my surprise, another user has already created the QMK firmware, but it was not under the original keyboard folder which was why it went under my radar. Feeling ecstatic, I spent an evening porting the QMK configurations to Vial and made my first public pull request merge to a fairly large repository on Github :).
Tuning spacebar stabilizers
If you browse r/mechanicalkeyboards, most will say tuning the stabilizers on the 6.25u spacebar is the worst part of building a keyboard. There are so many nuaces to what makes the spacebar sound off - the housing, the unbalanced wires, over lubing, tightness tolerance etc. that I think I geniunely spent over 12 hours trying to fix my spacebar.
All the stabilizers I have tried:
- GMK stabilizers
- Durock v2 stabilizers
- TX AP stabilizers
- SwagKeys Knights v3 stabilizers
GMK and Durock v2 stabilizers did not prevent ticking no matter how much I tuned them. I gave up for around two years until it bothered me again and suddenly new stabilizer contenders showed up, TX AP stabilizers and SwagKeys Knights v3 stabilizers.
SwagKeys Knights stabilizers were out of stock so TX AP stabilizers it was. To save suspense, TX AP stabilizers did not fix all my problems but came very close to being too. I bought the PCB clip-in version which for my keyboard layout (gasket mount) made the stabilizers lift up because there was no stable way to hold them in. Besides that, the spacebar still had a minor tick (I’m a perfectionst) so while it was 99% better than before, the unfilled 1% made me continue looking for solutions.
SwagKeys Knights stabilizers were positively received in the community so I was really crossing my fingers that these would actually work. I saw that they were in stock so once again, I have put stabilizers in my cart for checkout.
I tuned the SwagKeys Knights stabilizers with all the methods I knew - wire balancing, light lubing, and plumbers tape mod, but I just could not get the spacebar to sound good. Losing hope, I decided to “hail mary” and just mod the stabilizers with no external-gimmic mods and only lubed the wires and housing and … it worked?? I couldn’t believe it like some black magic happened. I hope my spacebar sounds beautifully as it is now until the remainder of time.
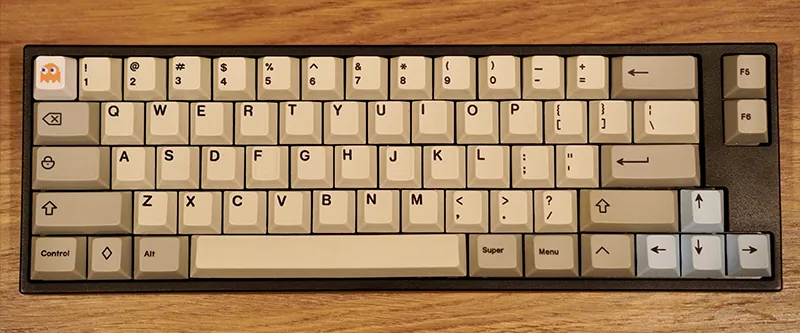
Keyboard #2 Leopold FC600M - Extensively Modded (65% keyboard)
Specs:
- Owned since 2017; first “real” mechanical keyboard I owned
- Switches: Alpacas stems and lower housing w/ Gateron Yellow upper Housing
- Lubed with Krytox 205g
- Geniune Plate Mount Cherry Stabilizers
- Swapped with Clueboard V2 PCB
I didn’t want to shell out $400 for my first keyboard into the hobby so the $100 Leopold FC660M was right up my alley. It originally had Cherry MX Browns which I swapped with Mod-L Switches. Swapping switches required desoldering and modding this keyboard taught me important soldering skills.
Since this keyboard was made by a private company, they did not support QMK to allow reprogrammable keys. “What’s the point of getting this keyboard if I can’t customize the keys?” - I thought. Unsatisfied, I began to do some research.
I was aware of a designer who made a custom mechanical keyboard, Clueboard 66, that is based off of the Leopold FC660m layout. Turns out version V2 of their PCB fits into the Leopold FC660M case with some modding. With luck, I was able to find the exact PCB off of r/mechmarket and started my long journey of modding.
Challenges with installing Clueboard PCB
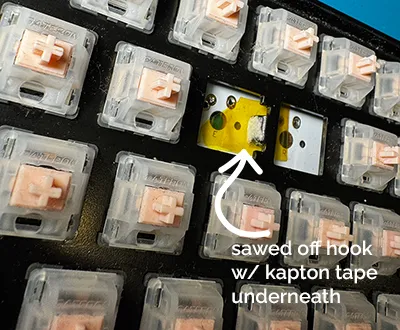
Leopold really did not want anyone to swap their PCB so they annoyingly designed their plate to have hooks that hook onto the pcb - this meant I cannot fit the replacement Clueboard V2 PCB with the plate without sawing off the hooks.
I had tools, but not the right tools, so sawing off 9 legs took a bit of time. I had to continuously test the tolerance and shave off hooks if they did not fit with the plate. I got the plate and PCB to finally align so next I soldered on my switches to test my keyboard.
At first the keys worked perfectly, but then random keys will have “hiccups” on whether they were activated. For example, if x = pressed and o = not pressed, then the key could have the pattern “xxoxoox”. The randomness of this problem made it hard to pinpoint the exact issue. I tried desoldering problematic switches, but then another key would have problems. Devasted, I shelved this keyboard into a closet for 2 years thinking the PCB was dead until two weeks ago I asked a friend about it - someone who introduced me to this hobby.
The friend said the randomness could be from the PCB shorting itself. I did not think shorting was the issue because I’ve never experienced before in my 8 years of building keyboards, but then it occurred to me that I cut off 9 hooks from the plate and those hooks are barely clearing tolerance and the metal would sometimes touch the PCB so of course it should cause issues. Excited with the new lead, I took my board apart and wrapped kapton tape around each of the hooks and after a week of testing the keyboard, my keyboard was functional again.
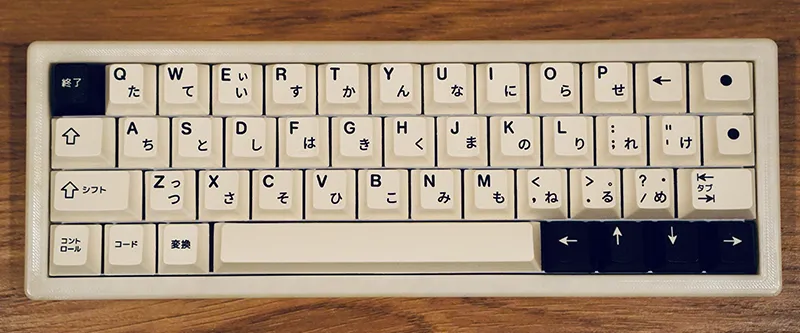
Keyboard #3: Qazpad (40% keyboard)
Specs:
- Owned since 2022
- 3D Printed case by Glow
- Switches: Silent Alpacas
- Spring swapped to 55g lubed with Krytox GPL 105
- Lubed with Krytox 205g
- Filmed
- Durock v2 stabilizers w/ Plumbers Tape Mod
- Installed Millmax Sockets 3305 for hotswap support
I’ve always been intrigued at the 40% layout and I knew in order to make it work, I needed a specific layout. Most 40% keyboards does not contain the " key which made transition from full size to 40% troublesome for me, but the Qazpad does.
Building this keyboard was smooth. The case set up took a bit of work with find the right M2 screw-ins and I wrote about it in the designer’s discord if you want to read about it.
This keyboard is fun to use and kind of always a brain workout to remember the different layouts whenever I use it.